A Coordinate Measuring Machine (CMM) is a common find in the metrology lab of many manufacturing facilities. They serve as a method to perform dimensional analysis and are important to ensure a part’s quality. In this article, we’ll discuss what a CMM is, the benefits and drawbacks of using CMM, and alternatives to CMM.
What is a CMM?
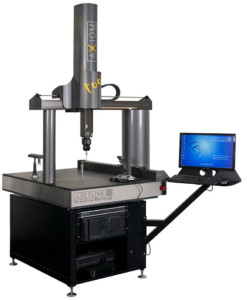
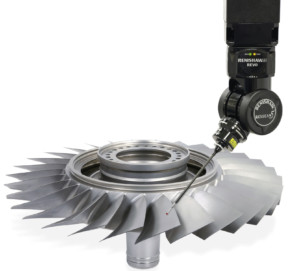
 A CMM is a metrology tool used to measure the dimensions of an object. It does this by touching a probe to a point on the part’s surface and recording its cartesian coordinates. Dozens or even hundreds of points are measured on a part and used to verify critical dimensions. As the selected points are collected, the CMM translates these points into usable data for comparing measurements to the original design drawing or CAD file. Parts can also be reverse engineered from the results of a CMM’s data.
There are several different types of CMM’s, such as bridge, gantry, horizontal arm, articulated arm, and cantilever. However, they all consist of the same basic components: a base, a computer, and a touch probe. The base of a CMM acts as a table for the part to be measured. These bases are built to be flat, smooth, and stable so the part will not move and cause inaccuracies in the collected data. The computer serves as the brain of the machine where it can be manually controlled or programmed to run the touch probe. This is also where the data points and measurements are recorded and calculated. Lastly, the touch probe is a smooth ball at the end of a stylus. Whenever this makes contact with the part, it signals to the computer to record its location in 3-dimensional space. For some CMM’s, the touch probe diameter and stylus length can be changed to allow the probe to reach more difficult areas of the part.
Benefits of Using CMM
CMM has many benefits, which mainly stem from its programmability. CMM’s are able to be manually operated or programmed via Computer Numerical Control (CNC). This enables high precision because it removes the possibility of human error. An operator can program the machine to take the measurements needed and leave it unattended while the process is completed. Additionally, programming the machine to run automatically is helpful when measuring multiple identical parts for part inspection and quality assurance. The same coordinates can be measured on each piece with the same process to ensure uniformity.
 CMM’s are highly accurate and able to measure a point’s location within 0.00001”. While a CMM’s accuracy can be altered due to temperature influence, ambient light has no effect on the touch probe’s reading. 3D scanning technology, which is often used as a viable alternative to CMM, is primarily optical-based. Ambient light in the room can blend with the light or laser from a 3D scanner and alter its accuracy. CMM does not have this issue.
Drawbacks to Using CMM
As with all technology, CMM has its drawbacks. The biggest concern with CMM is the barrier to entry. They are expensive industrial machines and can cost anywhere from $120,000 to $400,000. Because of this, you will typically only see CMM’s being used by large businesses who do enough manufacturing to justify the cost or by companies who specialize in offering metrology services.
Additionally, while the touch probe is accurate, it presents quite a few problem areas as well. Since only one data point is collected per touch of the probe, taking a large quantity of measurements can be slow and tedious. This is why the CMM touch probe is best for taking only a handful of critical dimensions. Additionally, because the probe must physically come into contact with the part to take a reading, small features are at risk of being damaged. This contact can also have adverse effects on the data if your part is flexible and thin enough that the probe may make an indention in the surface when contact is made. This will distort the measurements and lower the accuracy of your results.
Another drawback of CMM’s is that the majority of them are made to be stationary, so parts must be brought to the machine. If your part is immobile, you may have to invest in a portable CMM to be able to measure it.
3D Scanning as an Alternative
If your part is delicate, has internal geometry, or if you need thousands of data points quickly for a thorough inspection, 3D scanning can be a less expensive alternative to CMM. There are several types of 3D scanners, including laser, structured white light, structured blue light, and computed tomography. For an in-depth comparison of these technologies, click here.
 3D scanners have a number of advantages over CMM. The primary advantage is 3D scanners are non-contact. Scanners use lasers, light, or X-rays to capture data points and calculate measurements. As such, even fine features can be measured without risk of breakage. In terms of internal geometry, parts or assemblies have to be dismantled or put through destructive testing to take measurements of the inside. Even then, the measurements obtained may not be the most accurate. However, computed tomography (CT) scanning uses X-rays that penetrate the part without leaving a trace, making internal geometry a breeze to measure with no need for dismantling.
For part inspection and reverse engineering, 3D scanners work just as well as, and often better than, CMM probes. This is because 3D scanners are able to record thousands of data points at a time as opposed to CMM’s one point per touch. Due to this fact, 3D scanners generate whole images of a part much faster than CMM and give you thousands of points to compare to the original drawing or CAD. To get the same amount of data with CMM, it would take exponentially longer.
Finally, besides CT scanners, which require that the part be placed inside it, there are portable versions of each 3D scanning technology. These can include handhelds or tripod mounts, which make measuring immobile parts easy.
These advantages are important to note, but, ultimately, your decision between 3D scanning and CMM probe will depend on your specific needs for the dimensions.
3D Scanning at 3 Space
Here at 3 Space, we offer many 3D scanning technologies, such as laser, structured blue light, structured white light, and CT scanning. We also offer services in dimensional inspection and reverse engineering. Our engineers have years of experience, so you can be certain you’ll receive the best results possible. We even offer help with deciding on the best technology for your measurement needs, so we can assist you in making the decision between 3D scanning and CMM. For assistance or more information, contact us here.
