Overview
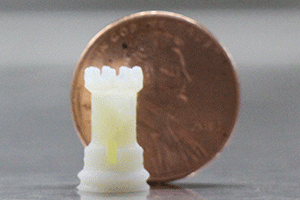
PolyJet 3D printing is a highly accurate form of thermoset printing that works with photopolymers that are cured by UV light. This type of printing can create parts with the properties of both hard plastic and rubber, or a combination of both. It is best used for cosmetic prototypes, but it can also be used for end-use parts for some applications.
As with all 3D printing technologies, there are a number of factors that must be taken into account when designing parts for Polyjet 3D printing. This guide will provide best practices for designing parts to be printed with our PolyJet printers. By following this guide, you can ensure that your parts print correctly and can do the job you need them to do.
The Printing Process
Like with FDM printing, PolyJet requires that a model be split into thin cross-sectional layers before it can be printed. These layers act as a guide for the printer to build the design layer by layer. After the printer’s control software performs this slicing, your design is ready to print.
The print head deposits the liquid photopolymers onto the build platform, in the shape of each slice. This print head contains an array of hundreds of small holes from which the material is deposited. After each slice is created, it is then passed over by a UV light, effectively curing and solidifying the materials into place. PolyJet printers repeat this process of depositing and curing the materials layer by layer until the part is complete.
As for support material, PolyJet uses a wax-like material that is removed in post-processing. While this support material is dissolvable in a lye solution, we have found that it’s best to manually remove it because the lye solution may easily damage the design. As such, most of the support material may be peeled or scraped away, and then any remaining residue is removed in a parts washer.
Designing for PolyJet
To produce the best possible design for PolyJet, it is important to consider the specifications of the physical printer as well as its limitations. Here are some things to take into account when creating or modifying your design for PolyJet:
Build Volume
The build volume for our PolyJet printers is 19.3”x15.4”x7.9”, which means this is the maximum size of object a printer may create at a time. If your design is larger than these dimensions, it can be split into sections which can be printed separately and then glued together in post-processing.
 Layer Heights
The layer height at which PolyJet prints will alter the resolution and quality of the resulting product, including the time it takes to complete the print. The two layer height choices for PolyJet are 0.001” and 0.0006”.
If your design contains small features or textured surfaces, the 0.0006” layer height may be your best option. But for most parts, the standard setting will probably be enough.
Tolerances
As with any 3D printer, it is important to consider tolerance when creating your design. PolyJet printers have a base tolerance of ±0.005” for the first inch of printing. With each additional inch of printing, ±0.001” is added to the tolerance. Therefore, the smaller the part, the tighter the tolerance will be.
Infill Types
It is important to note that PolyJet 3D printers will only do solid infill on parts. This makes the resulting partmuch stronger than another type of infill. However, if you desire a different infill type, you will need to manually add this to your design in CAD. Bear in mind that the remainder of your part’s interior will likely be filled with support material.
Part Orientation
While part orientation matters greatly for FDM 3D printing, PolyJet produces such fine layers that print orientation is not much of a concern. Of course, if a smaller surface area is placed on the XY plane, more support material will likely be needed. As for minute elevation changes on a design, such as long curved surfaces, PolyJet may produce a noticeable layer line. While this may not have any bearing on many designs, it may be something to consider.
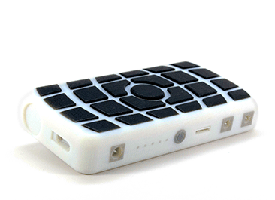 Multiple Materials
Since PolyJet can print in two different types of materials and varying degrees of hardness, it is important to know that your design file must be modified when wanting to use different combinations on the same design. For each different material or level of hardness, a separate STL file must be saved. For example, a design that will use a hard plastic, a medium hardness rubber, and a soft rubber, three STL files would be needed. This will disperse your design across three different STL files, but this will allow the printer to properly manufacture your design to your specifications.
Feature Design
How you design your features for different printers will determine your results when your parts are printed. When creating a design for PolyJet, consider the following feature recommendations:
Wall Thickness
Wall thickness depends a lot on what material you are using to 3D print. Since PolyJet can produce such a large spectrum of soft to hard results and the purpose of your design may vary, this is especially crucial. It is recommended that the absolute smallest wall thickness should be 0.04”, with 0.06” and greater being the best choice for the majority of PolyJet projects. Be aware that such a small wall thickness can make a product fragile, so it is wise to consider the rigidity required for your product’s intended use. Functional parts or parts that will be handled frequently will require thicker walls to ensure their longevity.
Holes/Pins
With any type of hole, you always want to ensure a proper fit with the pins or other fasteners you are using. For PolyJet 3D printing, we recommend either over-sizing your hole OR under-sizing your pin by 0.005″ to ensure clearance. For larger parts, we recommend considering a higher clearance due to tolerance stacking.
Designing pins really depends on your product’s intended use. Small pins are fragile and easily broken off. Thick pins will allow for much more strength and stability in your product, which will help with longevity and reliability. To ensure best results, consider what type of strength your product requires to complete its function. Ultimately, we recommend no pins be smaller than 0.04” in diameter.
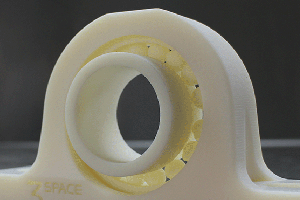
Fillets/Chamfers
Both of these features are produced well on PolyJet due to the small layer heights, making it much smoother on a PolyJet printer than FDM. If you believe your part will perform better with one or both of these supporting structures, don’t worry about sacrificing aesthetic for strength because PolyJet will produce a strong, smooth piece that will still fit your appearance standards.
Bosses/Ribs
For added support, especially to flexible materials, you can add bosses and ribs to your design. It is best to position these to hold areas where more strength will be required. Additionally, freestanding features, like overhangs, should be supported with one of these two structures. These should follow the aforementioned recommendations for wall thickness on PolyJet.
Threads/Fastening Hardware
If you are planning to incorporate threads into your design for connecting multiple pieces, it is important to note that rounded roots and crests are highly recommended. This is because plastic, by nature, could chip at the edges. If you design sharp-edged threads and the edges do chip, this will not ensure a proper fit for your piece.
As for fastening hardware, since PolyJet works with thermoset materials, heat-set inserts are not an option. This is because thermoset materials will not melt and conform around the insert like thermoplastics. Instead, PolyJet can produce tight snap fit results. In this case, consider the tolerances outlined above to ensure your design will fit together as intended.
 Assemblies
Because PolyJet can accommodate such fine details, functional assemblies can be printed in a single build. To achieve this, make sure your design allows for 0.005-0.01” between the parts of the assembly to be printed.
Text
PolyJet can produce both raised and recessed text. When adding text to your design, it is best to adhere to the recommended wall thickness for PolyJet. However, slimmer text may be achieved by going under the minimum wall thickness if the text is kept vertically short/shallow. If the text is thinner than the recommended wall thickness and is too tall, it may be easily broken off in post-processing. Likewise, recessed text also poses a problem if it is too thin and too deep because the support material will be difficult to remove.
PolyJet at 3 Space
At 3 Space, we operate top-of-the-line PolyJet 3D printers for all your PolyJet needs. Our technicians have put in hundreds and hundreds of hours getting to know the ins and outs of PolyJet printing and post-processing to produce the absolute best results for you.
For more information on our PolyJet 3D printing services, contact us today.