This blog post is part of our Post-Processing series. For more information on post-processing, check out our articles on assembling and smoothing and coloring and coating.
The majority of 3D printing projects require some type of support structure to be successfully printed. Understanding how to safely remove these support structures can be critical to maintaining the function and/or aesthetic you desire for your part. In this article, we’ll explain in greater depth what support structures are, what purpose they serve during the printing process, and how the removal differs from one 3D printing technology to another.
What are Support Structures?
With 3D printing, a part is created layer by layer. Layers cannot always stand on their own though and often need support to remain in the proper position until further layers of the part’s body can be built to stabilize them. For instance, this is typically the case with overhangs and small features that have their initial layers built detached from the main body of the part 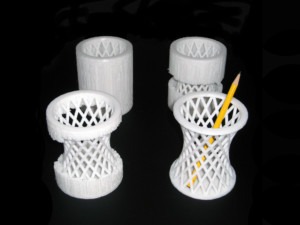 but later connect once more of the part has been completed. Until then, the layers are built with support structures, which are typically built from a different material than your model material. These structures serve no aesthetic or functional purpose other than to support, or anchor, layers during the printing process and are removed in post-processing. Support structures may also be used to draw heat away from the part so it may cool evenly and to keep the part from warping during printing.
The number of supports and their location on the part greatly depends on the part’s geometry and orientation on the build tray. If possible, it is typically best to orient the part so that supports connect to the part in a location that will not be easily visible. This is because supports always leave a mark where they are detached from the main body, which must be finished further in post-processing to achieve an aesthetically pleasing surface.
Removal Methods
Material is the determining factor for how support structures are best removed. Supports will vary in material depending on what 3D printing technology is used to create your part. For this reason, we have taken the six main 3D printing methods and explained each method’s support removal process below:
FDM
Most commonly, FDM support structures are built from a thermoplastic that can be dissolved in a chemical bath. The bath removes the support material with minimal labor and does not harm the model material. For high temp materials, however, such as PPSF and Ultem, this  soluble material is not an option. Rather, they require a more durable support that must be removed manually.
PolyJet
For PolyJet, supports are made from a wax-like material. This material can be removed by soaking the part in a lye solution, but here at 3 Space, we have found this method to be damaging to the part. Instead, we recommend peeling or scraping away the support material. Any remaining residue can be removed via water jetting.
MultiJet
MultiJet uses a waxy support material similar to that of PolyJet. However, it differs in that it must be melted away in post-processing by placing the finished part in an oven. This is the only additive manufacturing technology that uses meltable support material. Using this type of support material is often helpful when creating blind cavities or other complicated geometry that could be damaged by manual support removal. After the wax-like support has melted, parts are further cleaned in an ultrasonic bath, a cleanse, and a final rinse. Any residue remaining after this process is able to be simply wiped away.
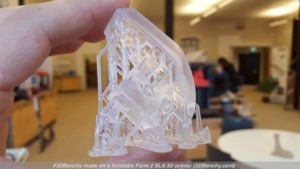 SLA
SLA
For SLA, there is no special support material used. Rather, the same resin that makes up your part is also used to make support structures. Once the part is removed from the vat of resin, these supports are manually clipped off, and the part is rinsed before a final curing in a separate chamber.
SLS
SLS is a unique 3D printing process in that it is the only method that does not use support structures. Instead, the unsintered powder from each layer becomes a support for the parts over time. The mass of powder compacts as more layers are added so that a sort of “cake” forms around the part. This holds the part in place just as traditional support structures do. 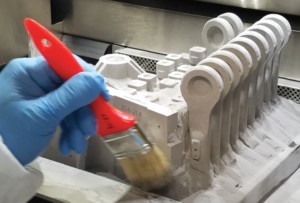 Once the part is completed, this cake is removed manually with a combination of hand brushes, compressed air, or another type of blasting media.
DMLS
DMLS support structures are similar to those of SLA. The supports are made from the same material as your part and must be manually clipped off after the print is completed. However, since DMLS 3D prints metals, the part must first go through a heat-treat cycle with the supports still attached so any stress in the part can be removed. After this step, the supports can be trimmed from the part as usual.
3D Printing at 3 Space
Here at 3 Space, we offer multiple 3D printing options for your project. With our team of expert engineers, you can be sure you’re receiving the best quality care before, during, and after printing so your part arrives just how you pictured. For more information or to request a quote, contact us today.